

EXTREME MACRO PHOTOGRAPHY
- Feb 18, 2025
- 8 min read
By: Francisco López Machado
Biologist and Nature Photographer.
By definition, macro photography is the type of photography that achieves a 1:1 magnification ratio, meaning that the size of the photographed object appears at its actual size on the camera sensor. This concept was easier to understand in the era of film photography. Back then, a 1:1 macro photograph could be easily verified: the object's size on the negative or slide matched its real-life size. For example, a penny would appear the same size on the negative or slide. However, if the object appeared larger than in reality, the technique would move into extreme macro photography or even microphotography.
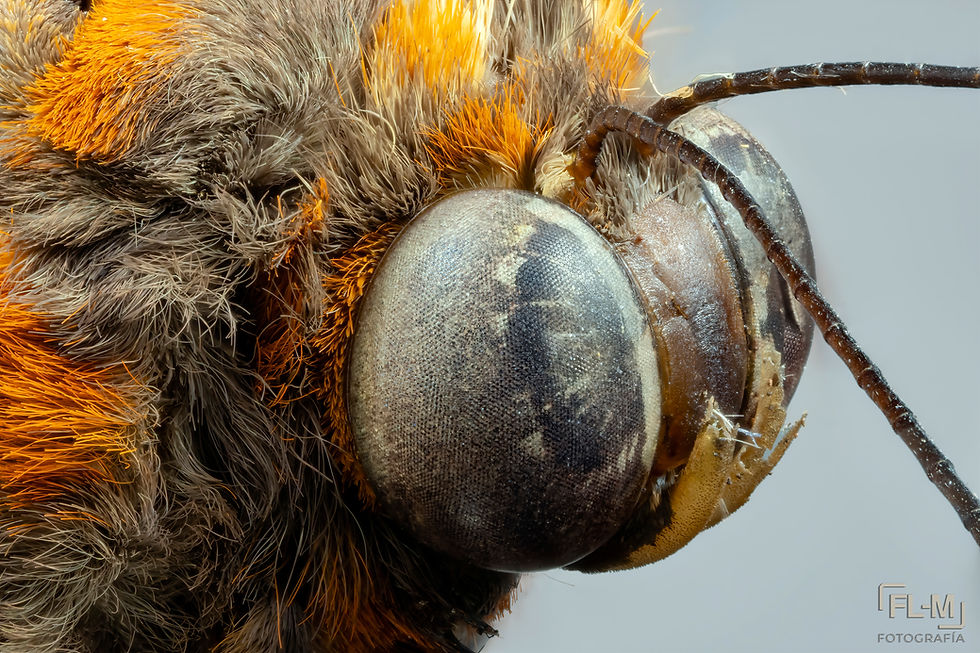
Figure 1. Close-up of the head of a Brassolis sophorae butterfly at 3X magnification.
We can summarize it as follows:
Macro Photography: As mentioned earlier, it begins when the photographed subject appears on the sensor at its real size or larger. This is known as a 1:1 magnification ratio or greater. For example, if you photograph an insect that is 10 mm long, it will appear 10 mm in size on the camera sensor. Most commercial macro lenses allow magnifications from 1:1 up to approximately 2:1.
Extreme Macro: This refers to magnification levels beyond 2:1, reaching up to 5:1 or more. This is where specialized lenses like the Laowa 25mm f/2.8 2.5–5X Ultra Macro come into play, allowing the capture of extremely small details, invisible to the naked eye. To push beyond these limits, accessories such as extension tubes or bellows can be used, with the entire setup mounted on a tripod and a focus rail for fine-tuned focus adjustments.
Microphotography: This occurs when microscopes or specialized equipment are used to achieve magnifications above 10X. This type of photography is mainly used in scientific fields to document cells, tissues, and other microscopic structures.
This article will focus on extreme macro photography and the equipment and accessories required to achieve it. Before continuing, it’s essential to clarify that, due to the extremely shallow depth of field in this type of photography, using the focus stacking technique is generally necessary (I have covered this topic in other articles—if you’d like more details, you can check the link to my blog on focus stacking photography).
Equipment
To begin with extreme macro photography, one can start with a standard macro lens that provides a 1:1 magnification ratio, meaning that the photographed subject retains its real size in the image. However, this magnification can be pushed further using accessories like extension tubes, bellows, or additional optics (e.g., the Raynox DCR-250 close-up lens). With these tools, it’s possible to reach 2:1 or even 3:1 magnification, surpassing the lens's initial limitations.
Additionally, there are specialized lenses on the market that allow magnification levels of up to 5:1 without the need for extra accessories. A notable example is the Laowa 25mm f/2.8 2.5–5X Ultra Macro (fig. 2) which offers impressive magnifications and is available for various mounts (Canon, Nikon, Sony, Fuji, etc.). When combined with extension tubes, it can achieve magnifications of up to 8:1, making it an incredibly powerful tool for extreme macro photography.
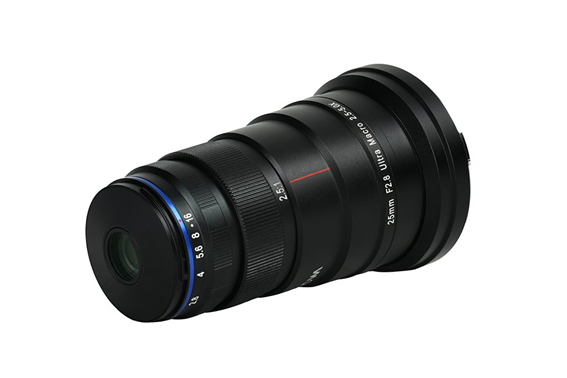
Figure 2. Laowa 25mm f/2.8 2.5-5X Ultra Macro lens. This Chinese brand offers a solid catalog of high-quality optics at a great price.
I use this lens with a Canon EOS 5Ds (50 megapixels), allowing me to capture images with an incredible level of detail. However, it’s important to note that this type of lens, like the Canon MP-E 65mm and the Laowa 25mm f/2.8 2.5-5X, does not have a traditional focus ring. Focusing is done by physically moving the lens forward or backward until the exact focal point is found, which varies depending on the selected magnification level. This is because the lens is completely manual, meaning there is no electronic assistance for focus, aperture control, or EXIF data transmission to the camera. The entire process is purely mechanical, adding an extra challenge.
A sturdy tripod is a must-have for this technique, ensuring the camera remains stable throughout the shooting process. Using a focus rail is also essential, allowing precise forward and backward adjustments to the camera’s position. This ensures accurate focus control, which is crucial for achieving sharp images.
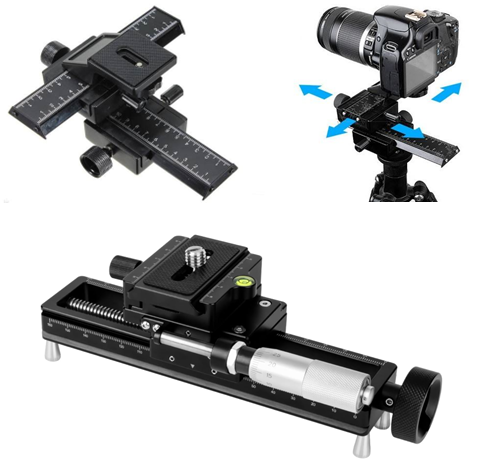
Figure 3. Top: Two-axis focus rail that allows movement of the camera in four directions.Bottom: Precision focus rail that enables much finer adjustments. Both tools improve framing and focus control.
Preparing the Subject
Extreme macro photography requires that the subject be firmly secured to its support. Whether it’s an insect, flower, or any other small object, stability is critical to avoid movement that could ruin the image sequence. It is recommended to use an adjustable base, allowing height and lateral position adjustments to perfectly align the camera with the subject. Styrofoam (polystyrene) blocks are also useful for positioning the subject according to the specific needs of each shot (Figure 11).
Alignment & Lighting
Before starting the shooting session, precise alignment of the camera and subject is crucial. Poor alignment can complicate the focus stacking process, affecting the final image quality. Once everything is perfectly aligned, lighting tests should be conducted to ensure uniform and consistent illumination.
Regardless of whether one or multiple light sources are used, it’s necessary to carefully adjust their intensity and angles, avoiding unwanted shadows. I use two main lighting setups:
A handmade lightbox, built from MDF with a white melamine coating, using a single powerful studio flash that reflects light evenly inside the box.
A PVC tube light cage, allowing me to position multiple light sources and change backgrounds as needed for each shot.
Additionally, I use small cardboard reflectors (white, silver, and black) to control reflected light and avoid harsh shadows. While this setup works well for me, commercial accessories offer similar solutions, allowing each photographer to find the best approach for their workflow.
Camera & Lens Settings
The Laowa 25mm f/2.8 2.5–5X is a game-changer in extreme macro photography, offering magnifications between 2.5X and 5X. As mentioned earlier, everything is completely manual: the aperture is fixed between f/2.8 and f/16, but stopping down beyond f/5.6 is not recommended, as it darkens the viewfinder image and increases the risk of diffraction (loss of sharpness).
Given the extremely shallow depth of field at these magnifications, focus stacking is commonly used, shifting focus in tiny increments (fractions of a millimeter). Using a remote shutter release or the camera's timer is essential to avoid vibrations, as even the slightest movement can ruin sharpness, even with perfect focus.
Processing and RAW Format
Focus stacking combines multiple images taken at different focal points, generating a final image that is completely in focus. Personally, I use Helicon Focus, a software capable of processing RAW files. Once the stacking process is completed, the program generates a DNG file in RAW format, which I then edit in Photoshop using Camera RAW or in Lightroom.
As I have mentioned in previous articles, RAW format is essential in professional photography because it preserves the maximum amount of data. This allows fine adjustments to white balance, shadows, highlights, saturation, and color tone. This workflow optimizes the result and ensures a more precise and refined image compared to starting from a JPEG file.
Examples and Applications
Below, I present four examples that illustrate the different levels of magnification achieved with extreme macro photography. The first image shows a Macraspis chrysis beetle at actual size (1:1), the second at 2.5X magnification, the third at 5X, and the fourth at 7.6X. Although the numerical difference between these values may seem minor, the increase in detail is astonishing. The textures, colors, and structures revealed at these levels of magnification showcase an impressive complexity.

Figure 4. Macraspis chrysis beetle at 1X magnification, taken with a Canon EF 100mm macro lens.
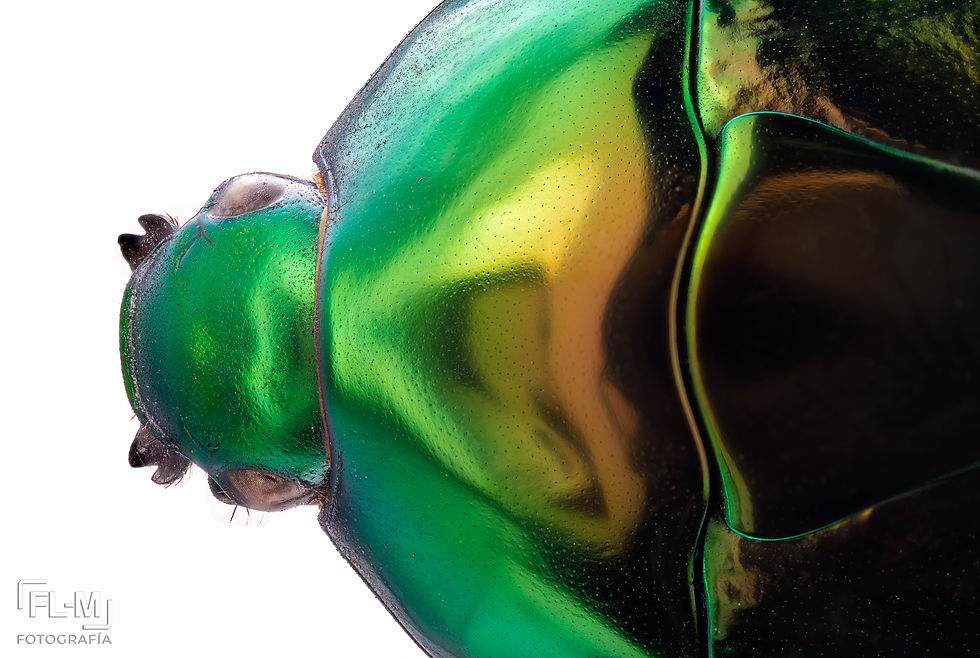
Figure 5. Macraspis chrysis beetle at 2.5X magnification, taken with the Laowa 25mm Ultra Macro.
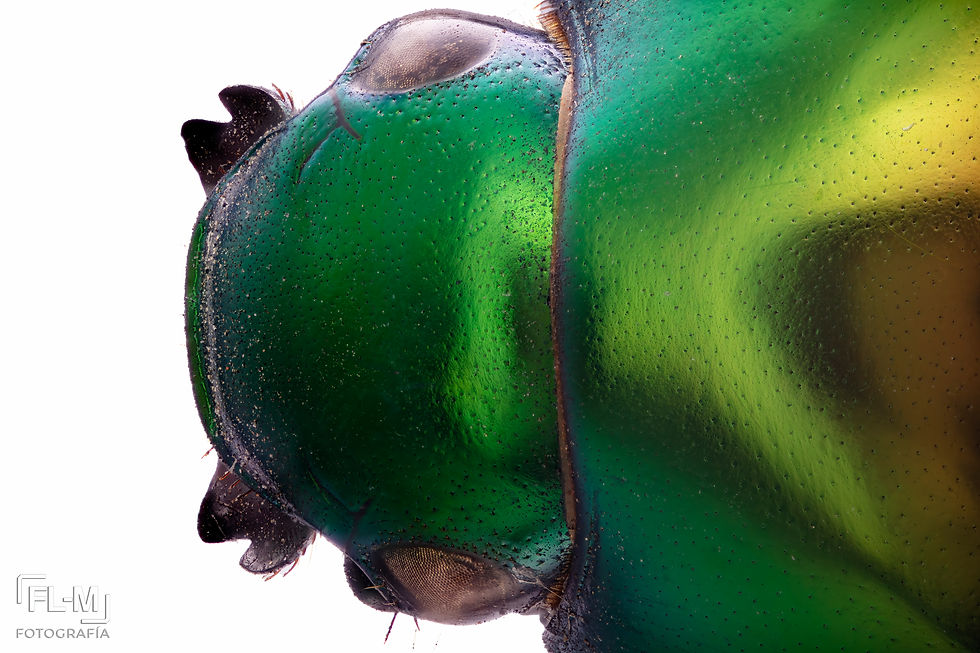
Figure 6. Macraspis chrysis beetle at 5X magnification, taken with the Laowa 25mm Ultra Macro.
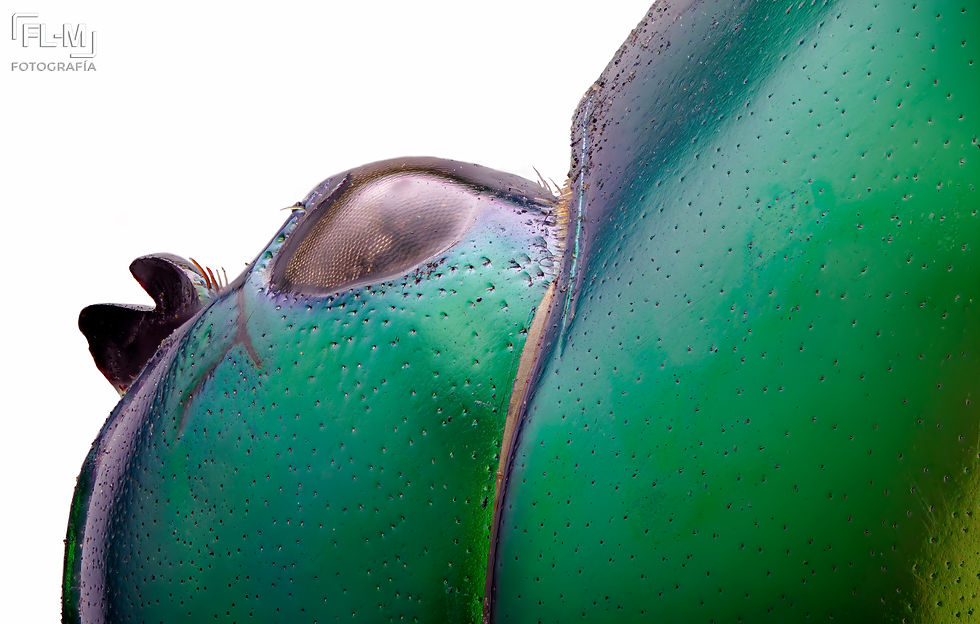
Figure 7. Macraspis chrysis beetle at 7.6X magnification, taken with the Laowa 25mm Ultra Macro plus 66 mm of extension tubes.
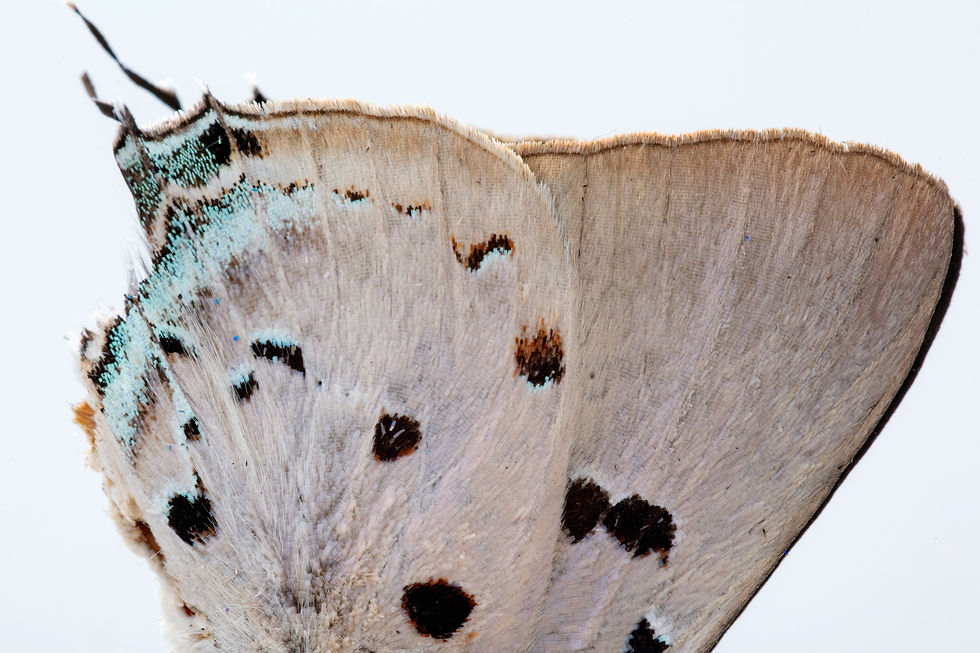
Figure 8. Wings of an Oenomaus ortygnus butterfly at 1X magnification, taken with a Canon EF 100 mm macro lens.
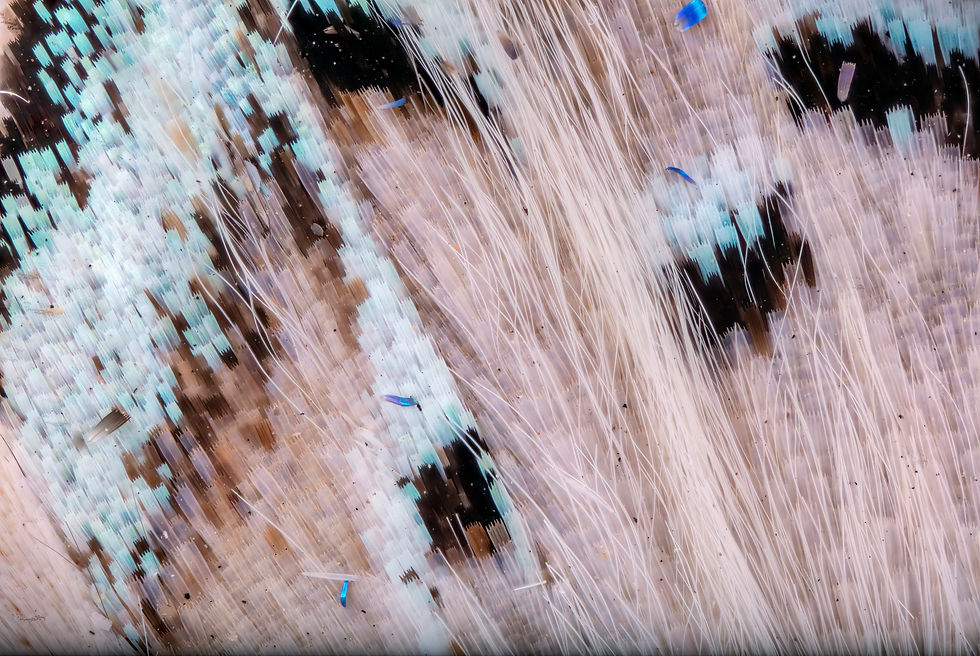
Figure 9. Wings of an Oenomaus ortygnus butterfly at 7.6X magnification, taken with the Laowa 25mm Ultra Macro plus 66mm of extension tubes.
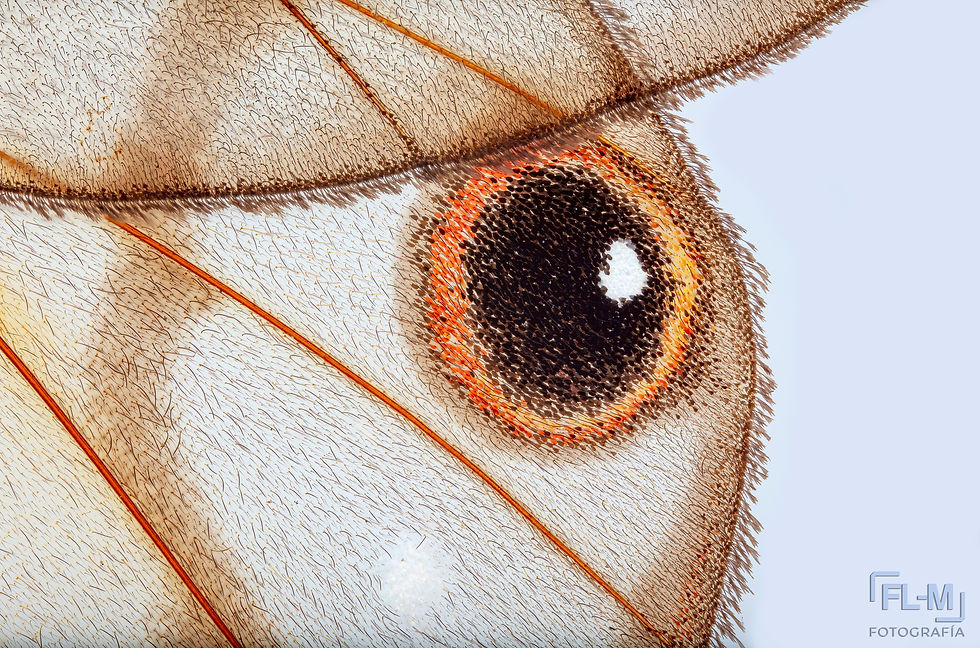
Figure 10. Wings of a Haetera piera butterfly at 2.5X magnification, taken with the Laowa 25mm Ultra Macro.
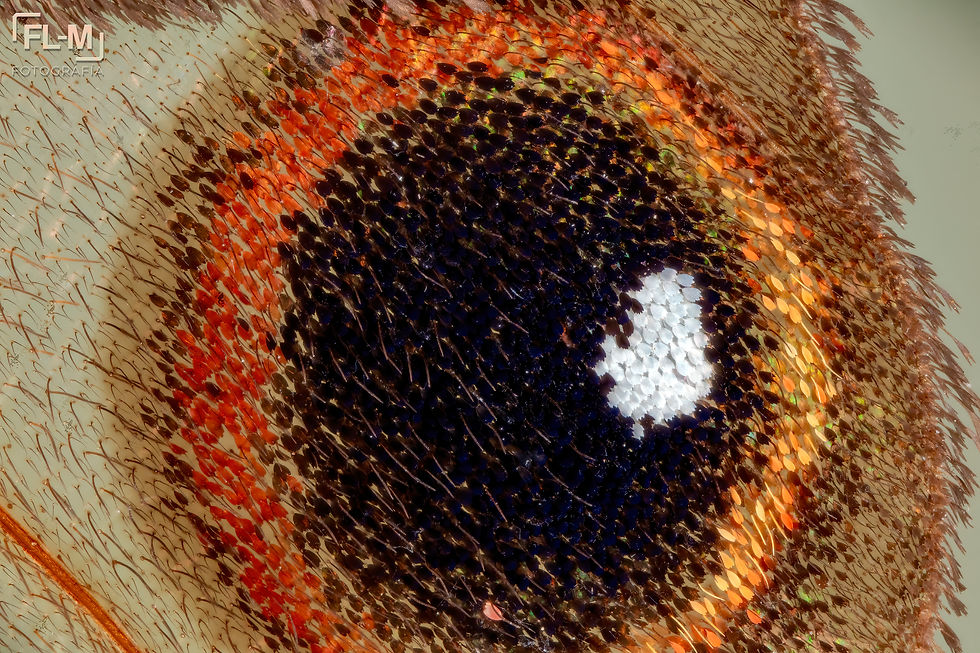
Figure 11. Wings of a Haetera piera butterfly at 8X magnification, taken with the Laowa 25mm Ultra Macro plus three extension tubes.
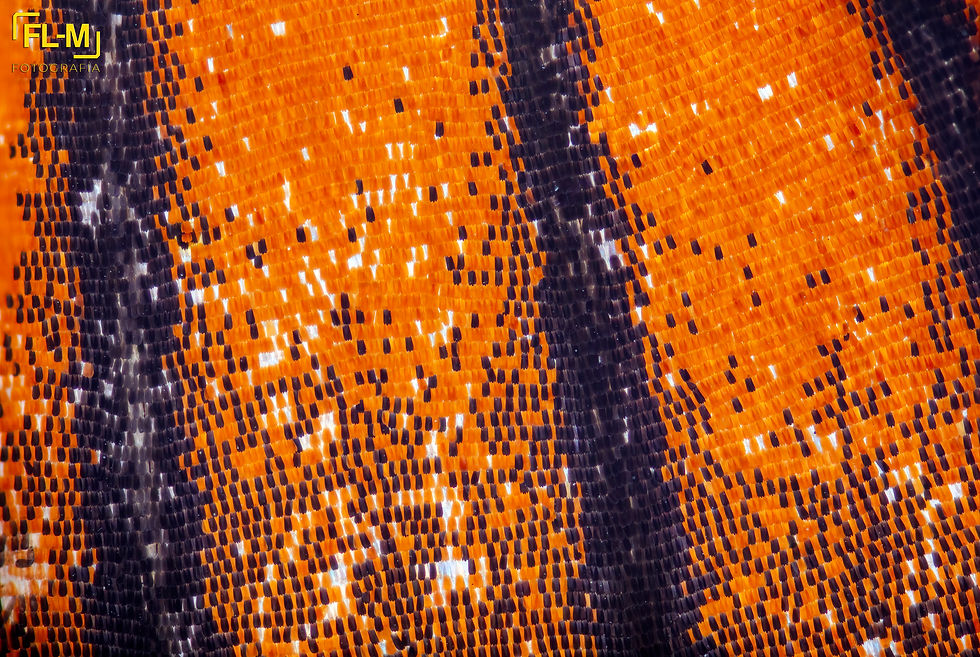
Figure 12. Wings of an Eueides vibilia butterfly at 7.6X magnification, taken with the Laowa 25mm Ultra Macro plus 66mm of extension tubes.
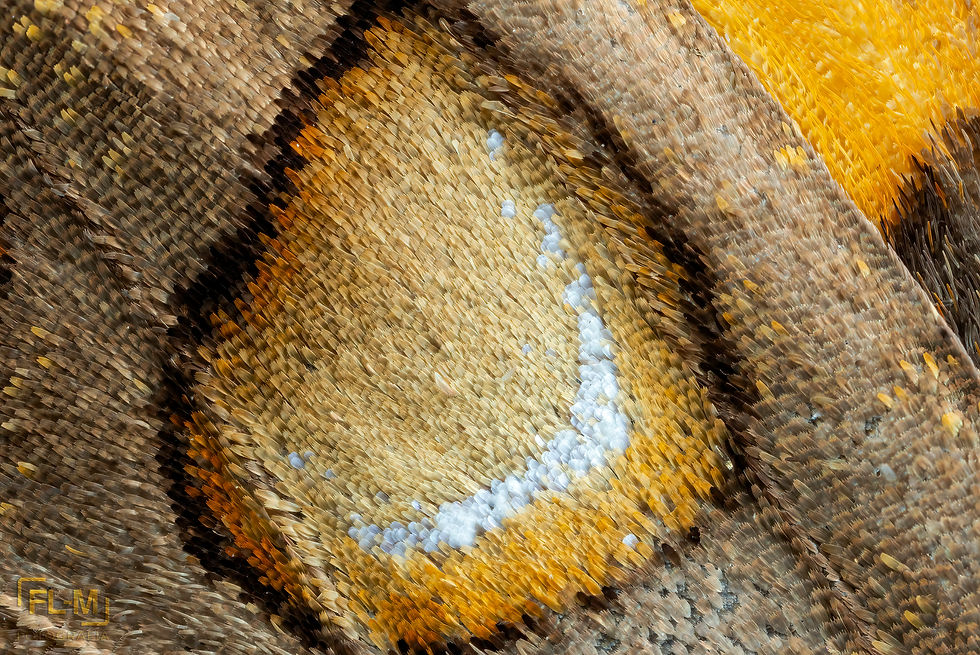
Figure 13. Wings of a Brassolis sophorae butterfly at 5X magnification, taken with the Laowa 25mm Ultra Macro.
Similarly, the next series of images demonstrates how magnification changes when using different accessories. It starts with a lateral view of an Eulaema nigrita bee at 1X, using the Canon EF 100mm f/2.8, and progresses up to 8X magnification by employing the Laowa 25mm f/2.8 2.5–5X along with four manual extension tubes (without electronic contacts). At this stage, it is advisable to use specialized lenses for microphotography, or alternatively, adapt microscope objectives to DSLR or mirrorless cameras. All these images were captured in the light cage setup with two Godox flashes and a remote trigger mounted on the camera (Figure 14).
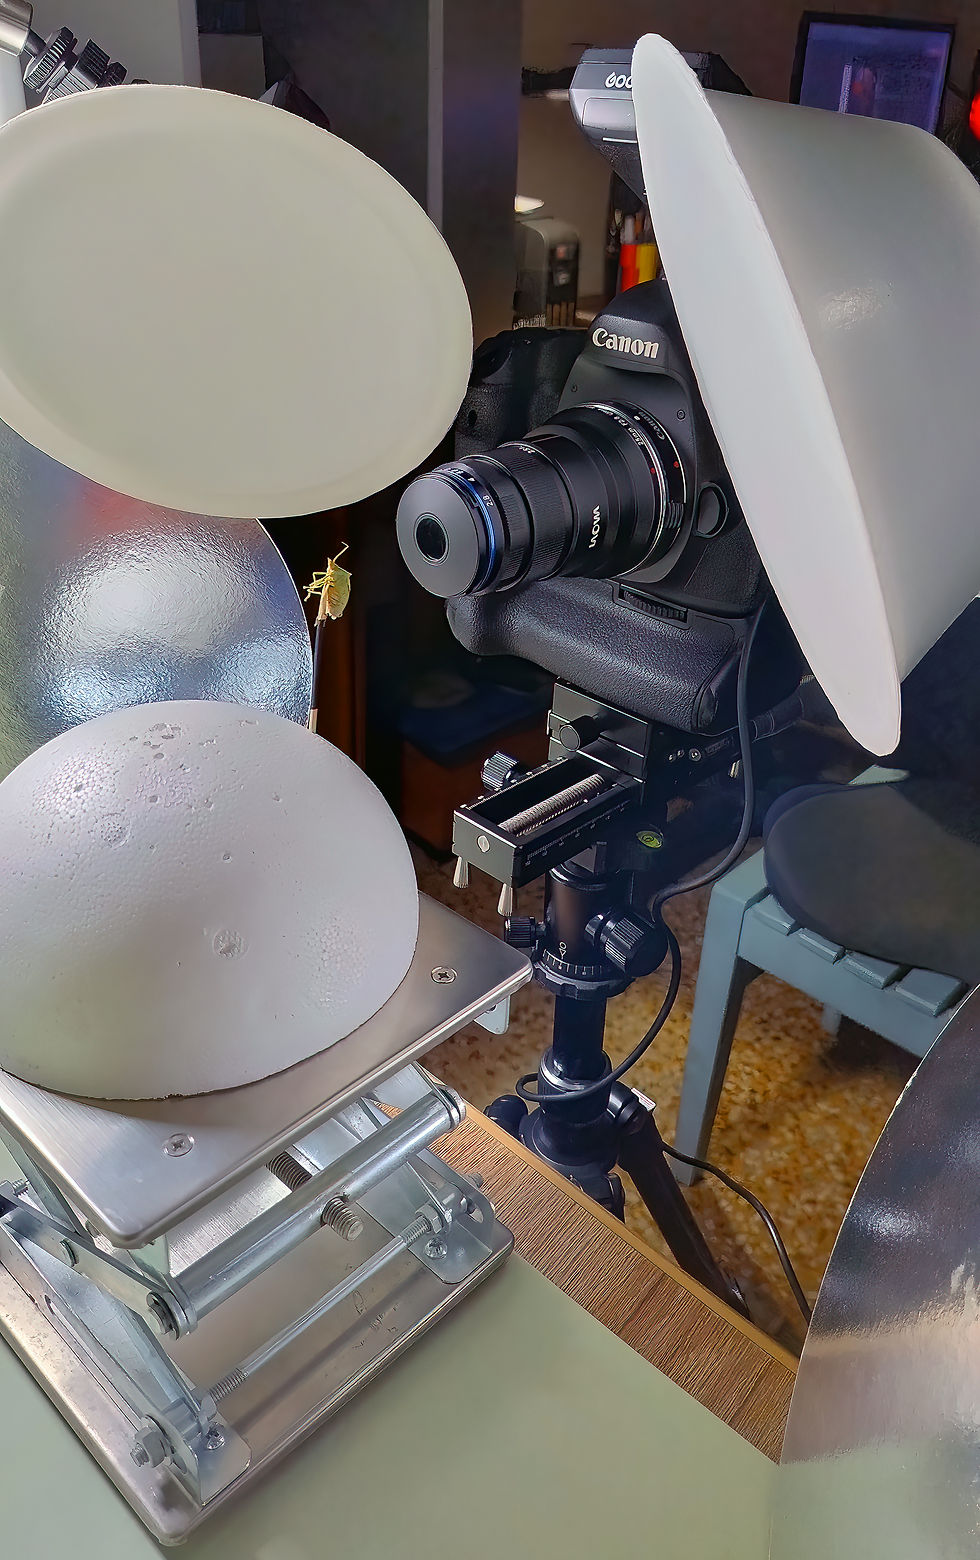
Figure 14. Set up inside the light cage, showing the placement of the subject and camera, along with additional accessories.
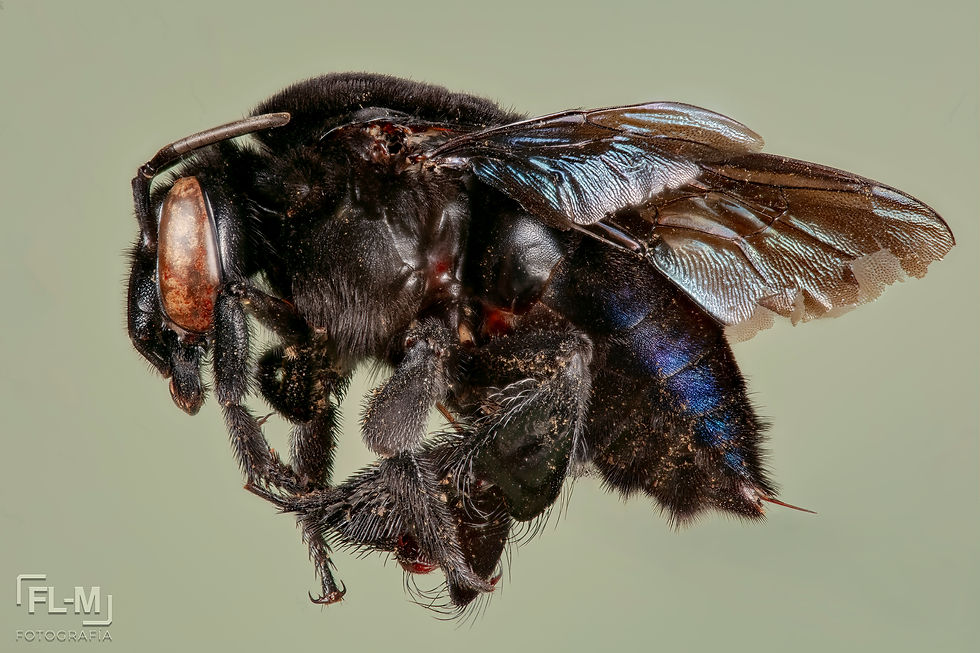
Figure 15. Native bee Eulaema nigrita photographed at 1X magnification with the Canon EF 100mm f/2.8 macro lens inside the light cage.
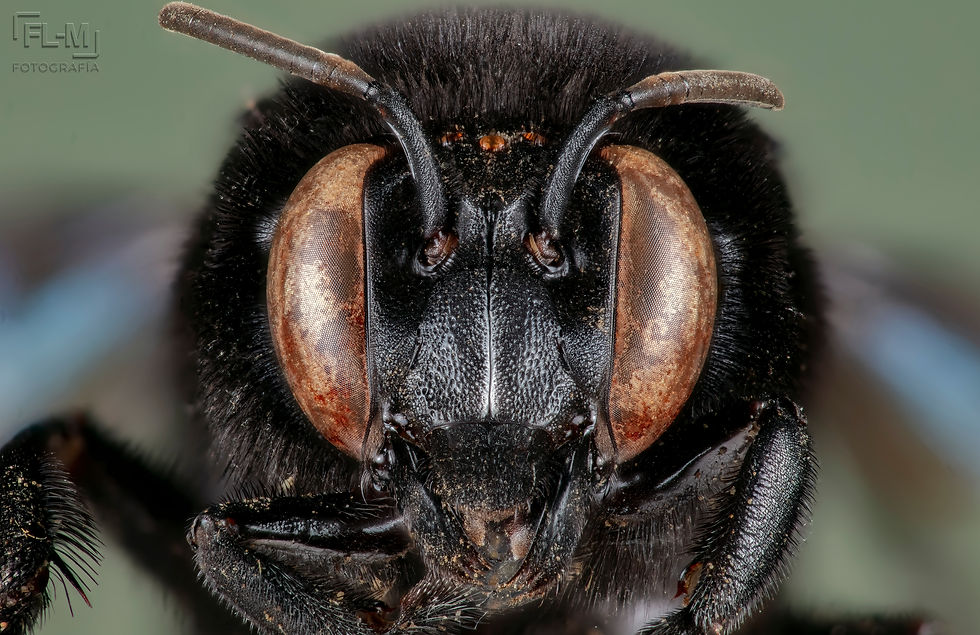
Figure 16. Frontal view of the native bee Eulaema nigrita photographed at 2X magnification with the Canon EF 100mm f/2.8 macro lens plus Raynox DCR-250 inside the light cage.
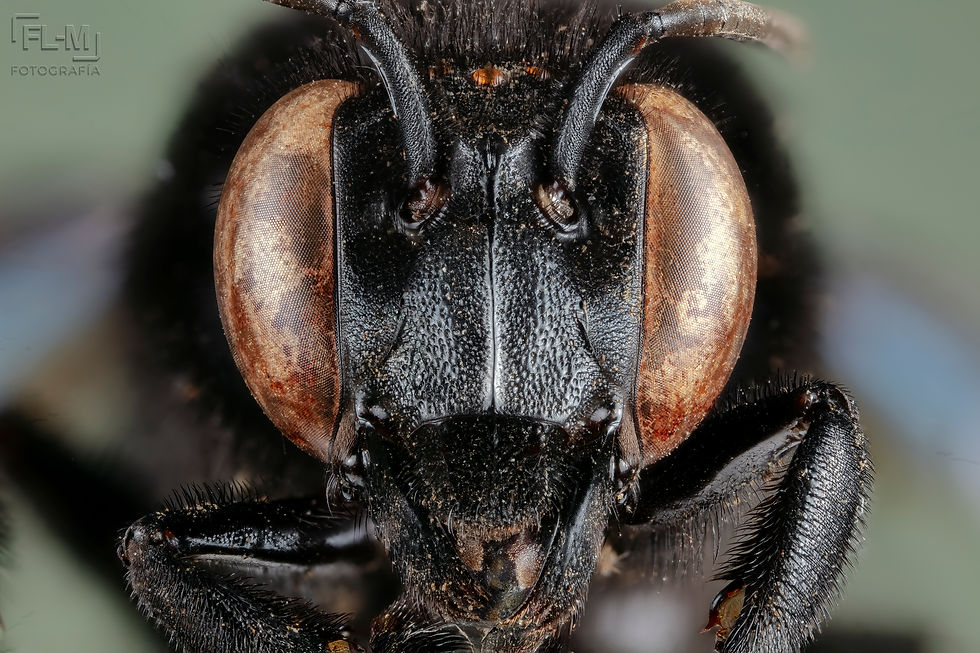
Figure 17. Frontal view of the native bee Eulaema nigrita photographed at 2.5X magnification with the Laowa 25mm f/2.8 Ultra Macro inside the light cage.
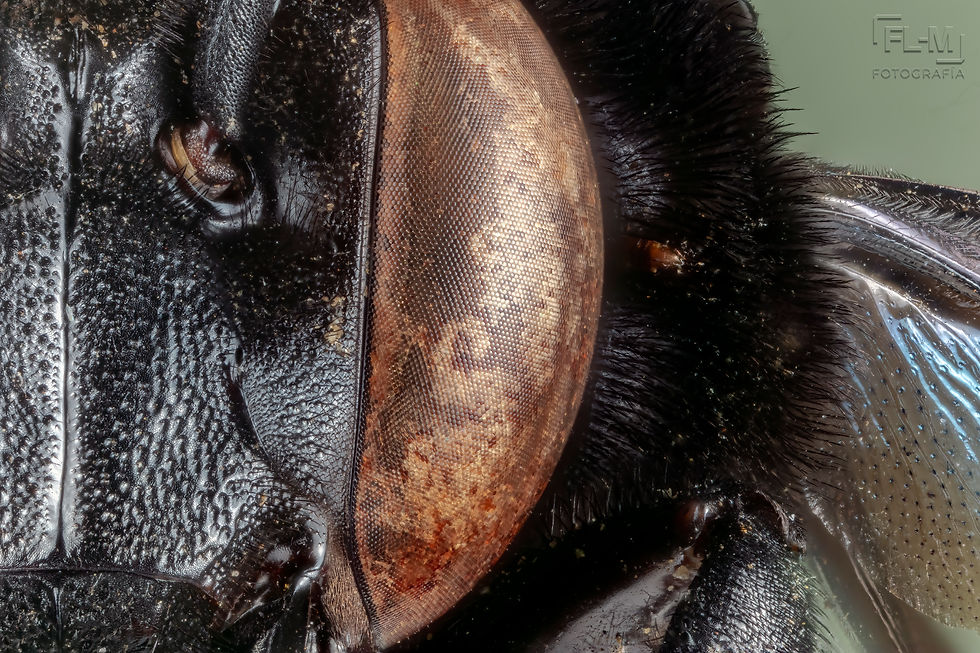
Figure 18. Frontal view of the native bee Eulaema nigrita photographed at 5X magnification with the Laowa 25mm f/2.8 Ultra Macro inside the light cage.
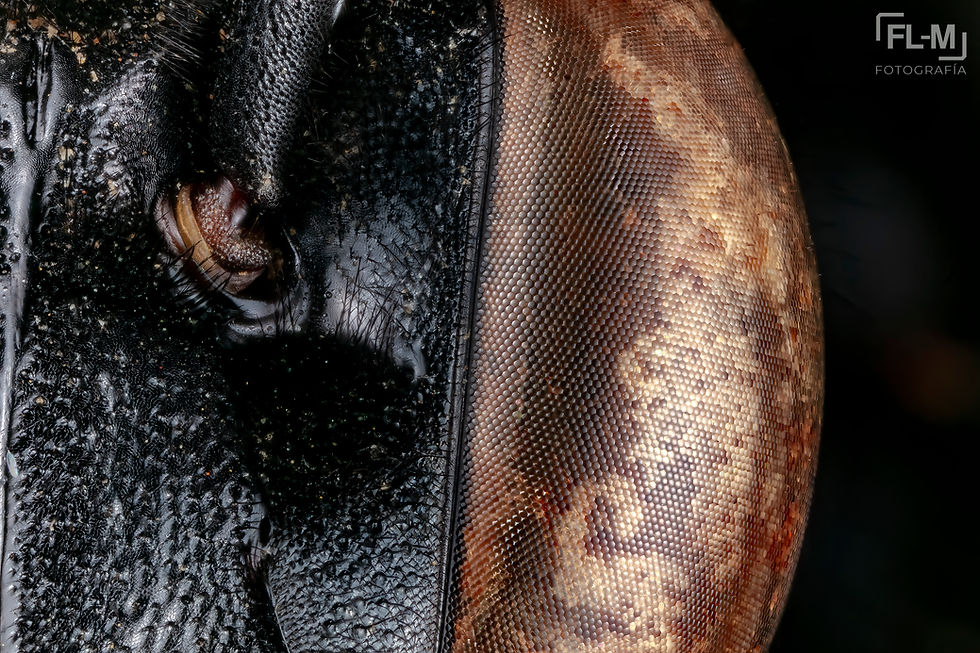
Figure 19. Frontal view of the native bee Eulaema nigrita photographed at 8X magnification with the Laowa 25mm f/2.8 Ultra Macro plus four extension tubes inside the light cage.
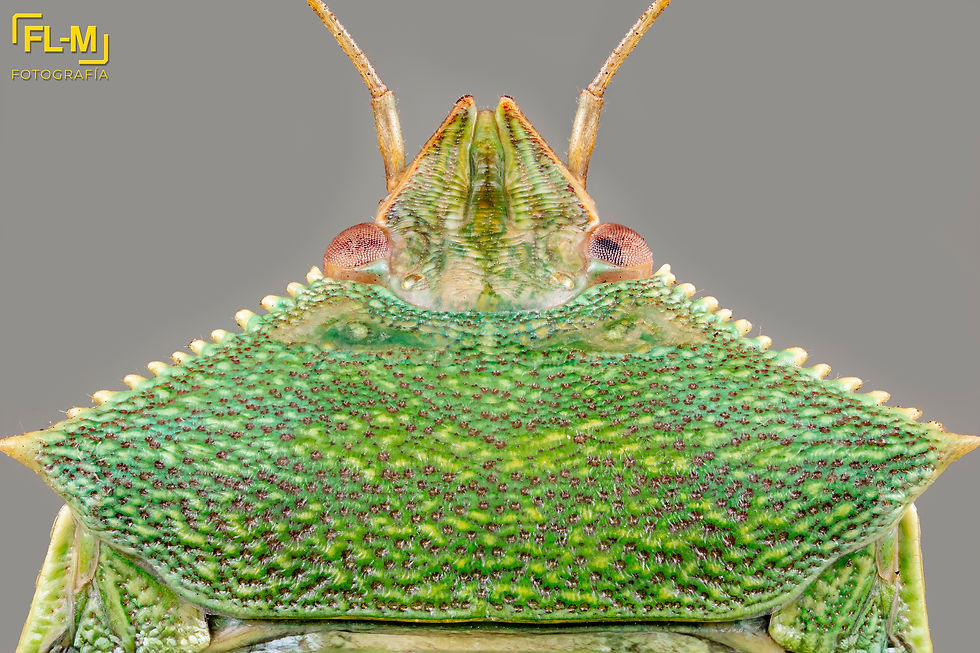
Figure 20. Loxa viridis bug photographed at 3X magnification with the Laowa 25mm f/2.8 Ultra Macro.

Figure 21. Loxa viridis bug photographed at 5X magnification with the Laowa 25mm f/2.8 Ultra Macro.
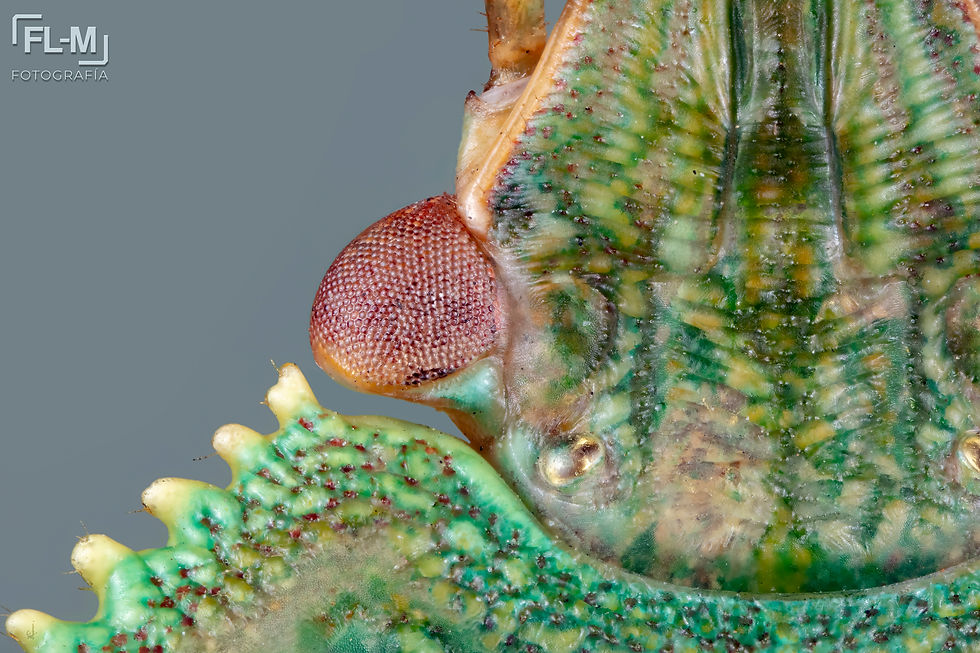
Figure 22. Close-up of the head and compound eye of a Loxa viridis bug photographed at 8X magnification with the Laowa 25mm f/2.8 Ultra Macro plus four extension tubes.
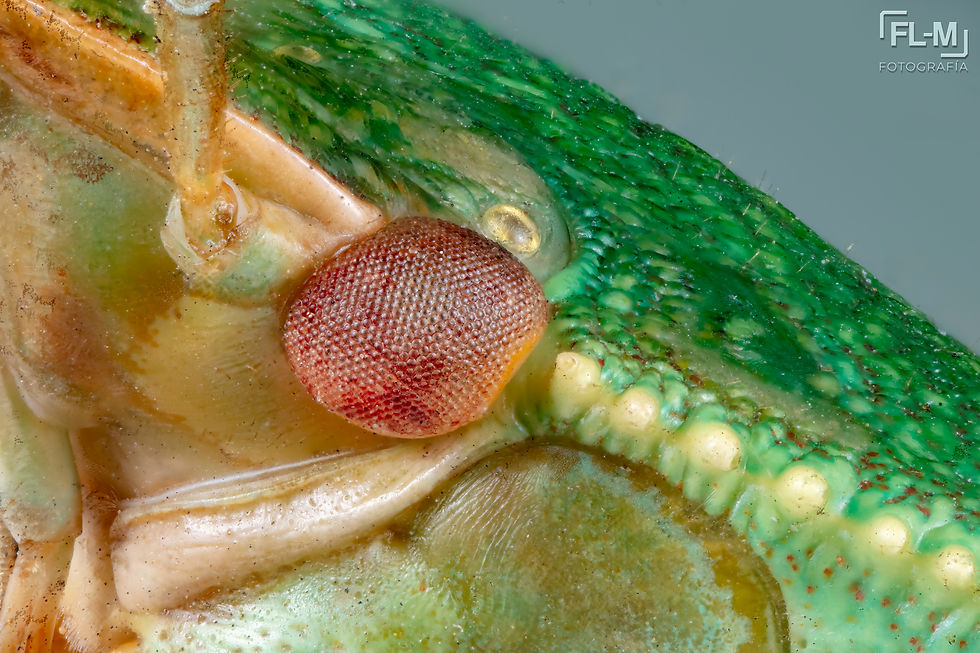
Figure 23. Lateral view of the eye and part of the head of a Loxa viridis bug photographed at 8X magnification with the Laowa 25mm f/2.8 Ultra Macro plus four extension tubes.
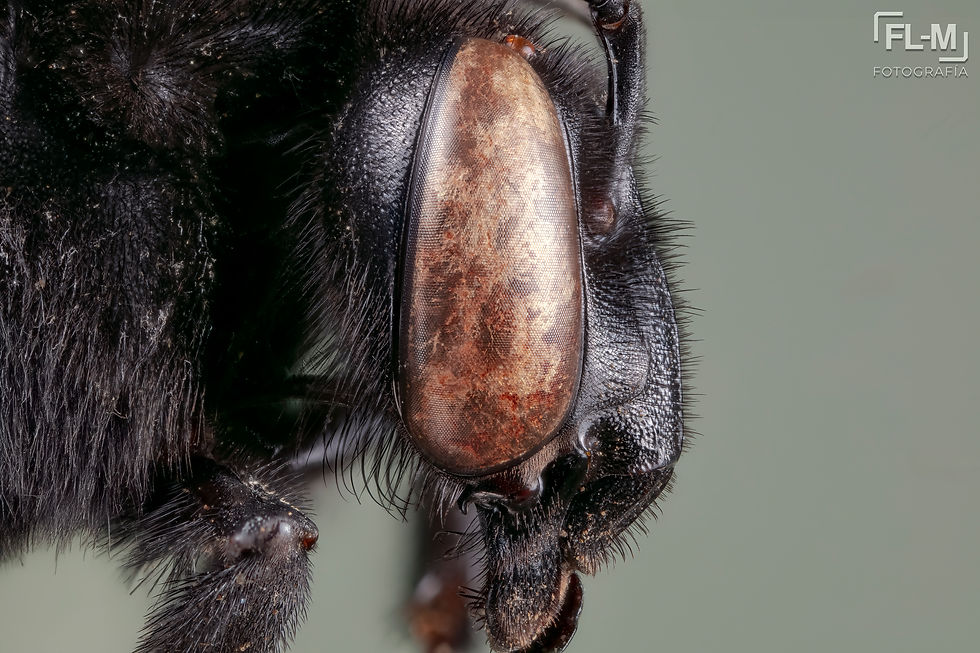
Figure 24. Lateral view of the eye and part of the head of a native bee Eulaema nigrita photographed at 2.5X magnification with the Laowa 25mm f/2.8 Ultra Macro.
Each final image is produced by stacking between 120 and 200 photographs, each captured at slightly different focal points. The stacking process was done using Helicon Focus, which generates a final image in DNG RAW format. This file is then opened in Photoshop via Camera RAW (or Lightroom, depending on the photographer’s workflow) to complete the final development and editing necessary to achieve the finished image.
Conclusion
Extreme macro photography offers a unique perspective into the microscopic world of insects, plants, and other tiny structures, revealing textures and colors that are impossible to see with the naked eye.
Although this technique requires patience, proper equipment, and technical knowledge, the results are more than worth the effort. Each magnification level immerses us in a fascinating universe, proving that nature’s beauty and complexity exist at all scales, even in those invisible to the human eye.
Francisco López Machado, Biologist and Nature Photographer


Comments